I Swapped My Shampoo for This DIY Rinse-Here’s What Happened
The Reason Behind My Hair Care Switch
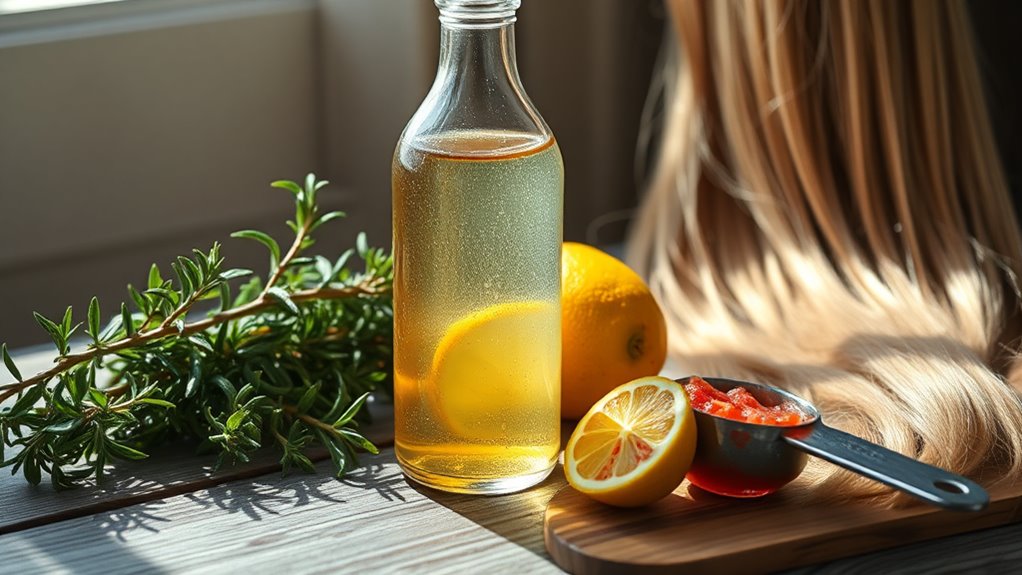
After years of using commercial shampoos packed with sulfates and synthetic fragrances, I finally made the switch to a DIY shampoo rinse, and it’s been a game changer for my hair. You’ll find that a natural hair rinse not only cleans without stripping essentials but also nourishes your scalp. A DIY cleaner can be made with natural ingredients that are safe for both you and the environment. Your hair feels lighter, healthier, and far more vibrant. It’s truly refreshing!
Ingredients for the Perfect DIY Rinse
When you dive into creating your DIY shampoo rinse, consider the key ingredients that won’t only cleanse but also nourish your hair and scalp.
Natural components like apple cider vinegar balance pH, while aloe vera moisturizes and soothes.
Essential oils such as lavender or tea tree refresh with delightful scents and added healing properties.
These ingredients work harmoniously to leave your hair vibrant and healthy. Additionally, using a DIY rinse can provide benefits similar to those of a DIY herbal cleanser, promoting overall hair and scalp health.
Easy Steps to Create My Hair Rinse
Creating your own hair rinse is simpler than you might think!
First, gather your ingredients, which can range from apple cider vinegar to herbal infusions.
Then, follow a few easy mixing and application tips to ensure your rinse works wonders for your hair.
Ingredients You’ll Need
You’ll often find that crafting your own shampoo rinse requires just a handful of simple ingredients, many of which are already in your kitchen. Gather some apple cider vinegar for shine, fresh herbs like rosemary or mint for nourishment, and honey for moisture. You might even add a few drops of essential oil for fragrance. These ingredients combine to create a nourishing treatment for your hair.
Mixing and Application Tips
As you prepare to mix your DIY shampoo rinse, gather your ingredients and tools to streamline the process.
Start with a clean bowl, and combine your chosen liquids, like apple cider vinegar or herbal tea, according to the ratios you’ve selected.
Stir well to ensure even distribution, then apply generously to wet hair, massaging it into your scalp for maximum benefit.
Rinse thoroughly.
Initial Reactions: The First Few Washes
As you wash your hair with the DIY shampoo rinse for the first time, you might be surprised by its strong cleansing effect, leaving your scalp feeling refreshingly clean.
You’ll notice your hair’s texture may change, requiring an adjustment period as it learns to adapt.
Plus, the unique sensations on your scalp could surprise you, highlighting how different this rinse is from commercial products.
Surprising Cleansing Effect
The first few washes with a DIY shampoo rinse can be a revelation, often leading to surprising results that delight and astonish. You might experience a fresh, clean sensation that invigorates your scalp and hair. Here’s what you might notice during these initial rinses:
| Wash Number | Cleansing Experience | Notable Reaction |
|---|---|---|
| 1 | Light and refreshing | Hair feels bouncier |
| 2 | Mildly stripping | Less product buildup |
| 3 | Gradually clarifying | Scalp feels revitalized |
| 4 | Unexpected softness | Hair starts to shine |
Adjusting to Texture
After experiencing that refreshing cleanse, you might find yourself confronted with how your hair’s texture is changing.
It’s an exciting adjustment, but it may take a few washes to fully appreciate. Expect:
- A softer feel with less frizz
- Enhanced curl definition
- More natural movement
- A unique, unexpected volume
Embrace these changes; they signal your hair’s transition to a healthier state.
Scalp Sensation Changes
You might notice an intriguing shift in your scalp sensation during the first few washes with your new DIY shampoo rinse. The tingling freshness can feel invigorating, while some may experience a mild itch as your scalp adjusts. This is perfectly normal! Here’s a quick comparison of sensations you might feel:
| Sensation | Feelings |
|---|---|
| Tingling freshness | Invigorated |
| Mild itch | Normal adjustment |
| Smoothness | Satisfying relief |
Notable Benefits I Experienced
Many surprising benefits emerged once I started using a DIY shampoo rinse.
You’ll likely notice a few transformations in your hair and scalp:
- Increased shine and luster
- Enhanced softness and manageability
- Reduced dandruff and irritation
- Improved scalp health
These advantages not only made my hair feel great but also boosted my confidence, turning my hair care routine into an enjoyable experience. Additionally, creating homemade dry shampoo can be a cost-effective alternative to store-bought products, allowing you to maintain great hair without breaking the bank.
Tips for Anyone Considering the Change
If you’re thinking about making the switch to a DIY shampoo rinse, it’s essential to start with a clear plan that suits your hair type and needs. Here are some helpful tips to consider:
| Hair Type | Recommended Rinse |
|---|---|
| Oily | Apple cider vinegar rinse |
| Dry | Coconut milk infusion |
| Curly | Aloe vera gel mix |
| Fine | Green tea rinse |
Additionally, keep in mind that using coconut oil can lead to surprisingly safe results for your hair health. Experiment, and enjoy the journey!