How I Got Better Results Using This DIY Toner Trick
Have you ever wondered why some skincare routines yield stunning results while others fall flat? When I faced dull, irritated skin, I turned to a DIY toner that transformed my complexion. By blending potent ingredients like witch hazel and aloe vera, I found a solution that addressed multiple concerns. Curious about how to craft your own version and achieve similar results? Let’s explore the process and ingredients that made all the difference.
The Inspiration Behind My DIY Toner
When I first stumbled upon the idea of creating my own toner, it felt like a light bulb moment. You know that feeling when you discover something that just clicks? That’s what happened.
Discovering the idea of making my own toner was a true light bulb moment, igniting my passion for personalized skincare.
I’d been searching for a solution to my skin’s dullness and irritation, and the thought of a DIY toner seemed perfect. It promised a natural approach, free from harsh chemicals and full of nourishing ingredients. As I imagined customizing it to my skin’s needs, excitement bubbled up inside me. I knew I was on the brink of transforming my skincare routine in a fun, creative way. Additionally, using DIY toner can significantly enhance your overall skincare routine by providing targeted benefits tailored to your skin type.
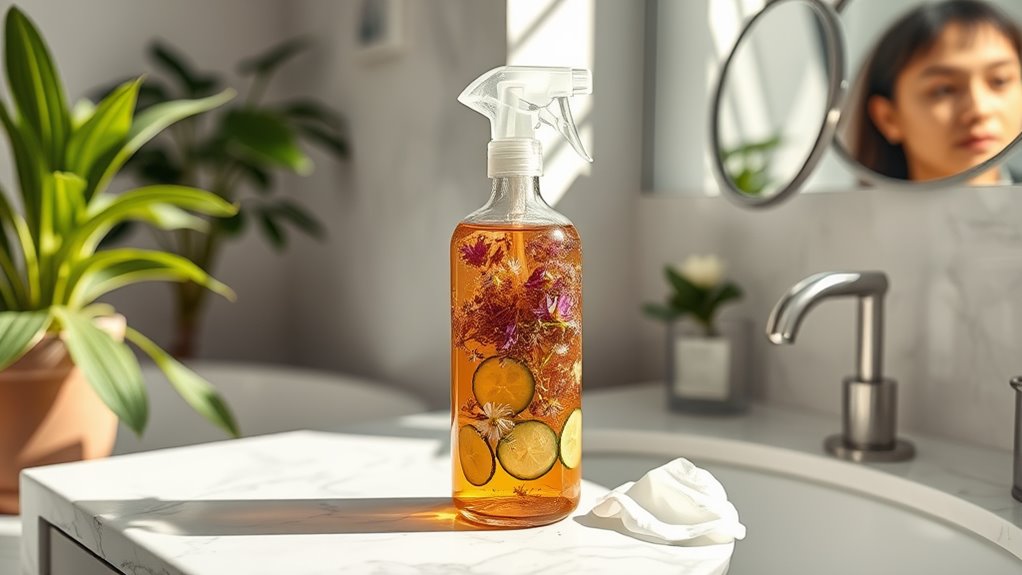
Key Ingredients for Maximum Impact
What makes a toner truly effective? The key ingredients you choose can transform your skin.
Look for witch hazel, a natural astringent that tightens pores and soothes inflammation.
Add aloe vera for hydration and skin healing properties.
Incorporate rose water to balance your skin’s pH and impart a refreshing scent.
For an extra boost, consider vitamin C for its brightening effects and antioxidant protection.
Each ingredient works synergistically to enhance your skin’s appearance, leaving it feeling refreshed and invigorated.
Using a simple natural toner can not only improve your skin’s texture but also promote a healthy glow.
When combined thoughtfully, these elements create a powerful toner that elevates your skincare routine to new heights.
Step-by-Step Application Process
After selecting your powerhouse ingredients, it’s time to put your DIY toner into action.
After choosing your key ingredients, it’s time to create your DIY toner masterpiece.
Start by cleansing your face to remove any impurities.
Next, pour your toner into a clean cotton pad, ensuring it’s saturated but not dripping.
Gently swipe the pad across your face, moving from the center outward.
Pay extra attention to areas prone to oiliness or breakouts.
Allow the toner to absorb for a minute; don’t rinse!
Follow up with your favorite moisturizer to seal in the benefits.
Finally, store any leftover toner in a cool, dark place for future use, keeping it fresh and effective. Additionally, incorporating DIY herbal formulations can enhance your skin health by using natural ingredients.
Observing the Results: My Skin Transformation
As you begin to incorporate your DIY toner into your skincare routine, you might notice subtle yet transformative changes in your skin’s texture and tone.
You’ll likely experience:
-
Improved hydration – Your skin feels plumper and more nourished.
-
Refined pores – Notice how your pores appear smaller and less noticeable.
-
Even skin tone – Dark spots and redness may diminish, revealing a more uniform complexion.
-
Increased radiance – Your skin glows with a healthy, vibrant sheen.
Additionally, using homemade products like DIY rose oil can enhance these effects, providing soothing properties and further nourishing your skin.
These results can motivate you to continue using your toner, making it a staple in your daily regimen for long-lasting beauty.
Tips for Customizing Your Toner Recipe
When you’re ready to elevate your DIY toner experience, customizing your recipe can make all the difference.
Start by selecting your base; witch hazel works wonders for oily skin, while rose water soothes dryness.
Next, consider adding essential oils like tea tree for its antibacterial properties or lavender for calming effects.
You can also infuse your toner with herbal teas—green tea fights aging, while chamomile reduces redness.
Don’t forget to adjust the acidity; a splash of apple cider vinegar can help balance your skin’s pH.
Experiment with different combinations to discover what truly works for your unique skin type! Additionally, incorporating effective homemade face masks into your routine can enhance your overall skincare results.